


I know that Instagram is primarily about sharing striking visuals — images, videos, promotions, and even acting as a storefront for one’s business. But in truth, I spend much more time reposting other people’s content than my own.
Sure, Instagram is a powerful social media tool that can help me increase my brand’s reach and attract new business.
![New Data: Instagram Engagement Report [Free Download]](https://no-cache.hubspot.com/cta/default/53/9294dd33-9827-4b39-8fc2-b7fbece7fdb9.png)
However, it’s also time-consuming and can be expensive to maintain the volume of original content needed to keep engagement growing long-term — which is exactly why I learned how to repost on Instagram.
In this post, I’ll walk you through a few simple, free ways to repost on Instagram. But before diving in, let me explain why and how reposting can benefit your brand.
Table of Contents
- Why should your brand repost on Instagram?
- How to Repost on Instagram
- How to Repost on Instagram Using a Screenshot
- What to Know Before Reposting on Instagram
- Resharing on Instagram Best Practices
- Best Apps for Reposting on Instagram
- FAQs About Reposting on Instagram
Why should your brand repost on Instagram?
Instagram is one of the largest social media sites on the market. With over two billion monthly active users, brands that incorporate the site into their marketing strategy can reach larger audiences and gain visibility faster over other social media channels.
And with an audience like that, you want to consistently post high-quality content — but that can take time, effort, and resources that may not fit your budget just yet. Since most marketers post between 3-4 times per week, you should have a backlog of content to keep up with demand.
Additionally, user-generated content (UGC) performs exceptionally well. In fact, 93% of marketers who use UGC in marketing campaigns say that it performs significantly better than traditional branded content, according to Billo’s study. That tracks since 70% of Gen Z and 78% of Millennials find UGC to be a very helpful part of their buying journey.
For instance, consider the power of Warby Parker reposting this funny image from one of its customers, @cjronson:
Not only does the image likely appeal to Warby Parker customers, but it ultimately made Warby Parker marketers’ jobs easier — they didn’t need to create that content in-house.
Reposting to Instagram can help you highlight brand endorsements from your customers, brand loyalists, and employees. UGC is typically considered more trustworthy since a consumer isn‘t gaining anything by promoting your product or service (unless it’s an advertisement) — they’re just doing it to tell their audiences that they like your product.
Instagram allows you to repost other users’ Reels and posts to your own Instagram Story using its native reposting functionality. However, it has its limits: It doesn’t let you repost to any permanent part of your Instagram profile, including your feed, Reels, or videos.
In other words, Instagram only lets you temporarily share someone else’s content for 24 hours max. If you do want to keep it permanently, you can add it to an Instagram Story Highlight.
If you’re looking to add a post to your permanent feed and credit the original creator, I’ll show you how to do that in the next sections. For now, let me show you how I repost content to my Story and add it to my highlights.
1. Navigate to the post, Reel, or video you want to repost.
I start by scouring Instagram for content that fits my brand. That could be regular posts, Reels, or videos. I do this in the following ways:
- Sometimes, I’ll search for popular industry hashtags to find great posts from other brands and influencers;
- Other times, I’ll look at my branded hashtags to see if any customers or fans have posted user-generated content.
- I also check for posts I have been tagged in and repost any that align with my brand.
- I keep an eye on the feeds of brands I admire to find posts that align with my style.
Note: Remember that you can only repost content from users and brands with public profiles.
You can also repost other people’s Stories, so long as you’re tagged in them. You can find those who’ve mentioned you in their Story in your Direct Messages.
If you’d like to connect better with people who tag you in their content, Social Inbox can help you with that.
This social media management software by HubSpot allows you to publish social media content from the same place you build campaigns, set up keyword monitoring so you get notified whenever someone mentions you (or your brand), and link all your interactions back to your CRM so you have contextual conversions with your audience.
2. Click the paper airplane symbol on the post or Reel.
Once I’ve decided on the post, Reel, or video I want to share, I click the little paper airplane icon. For photos and videos, it’s right next to the Like and Comment buttons.
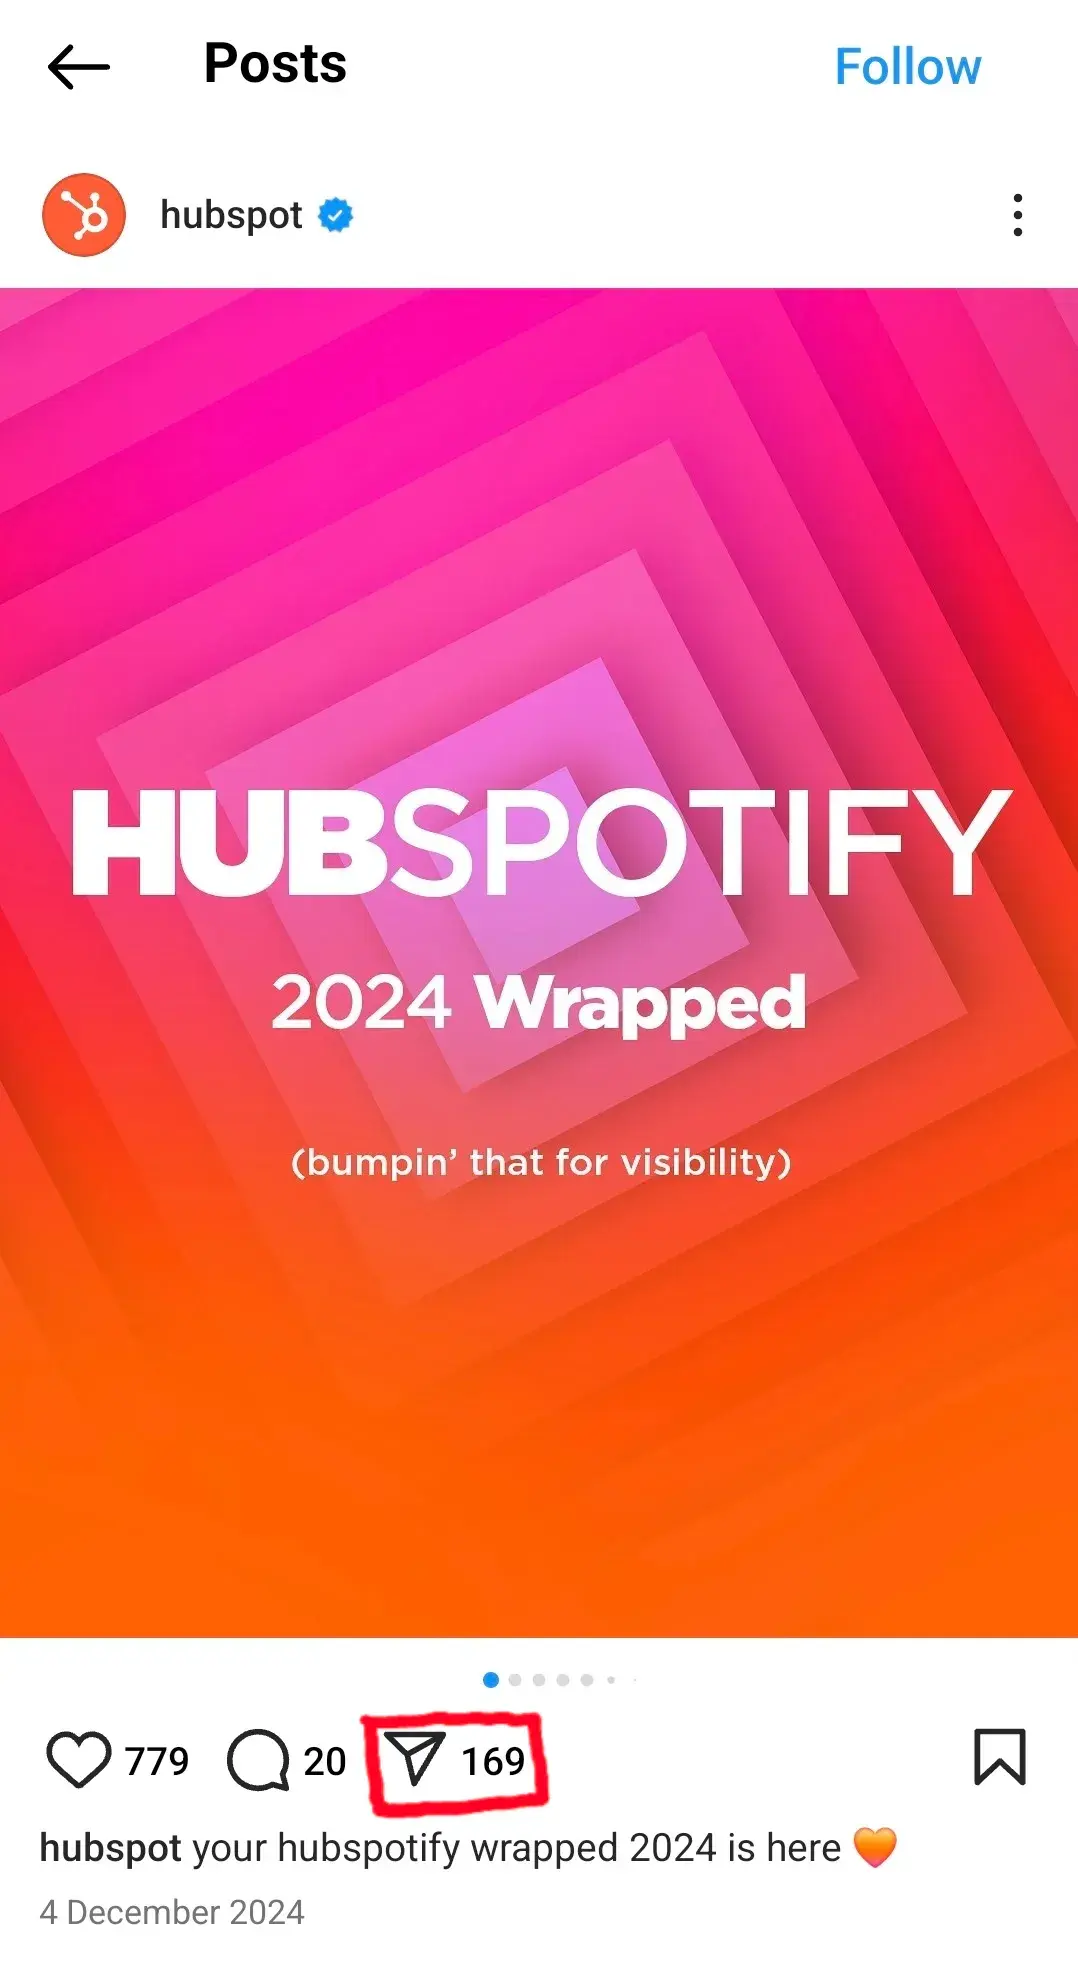
For Reels, it’s between the Comment button and the three dots.

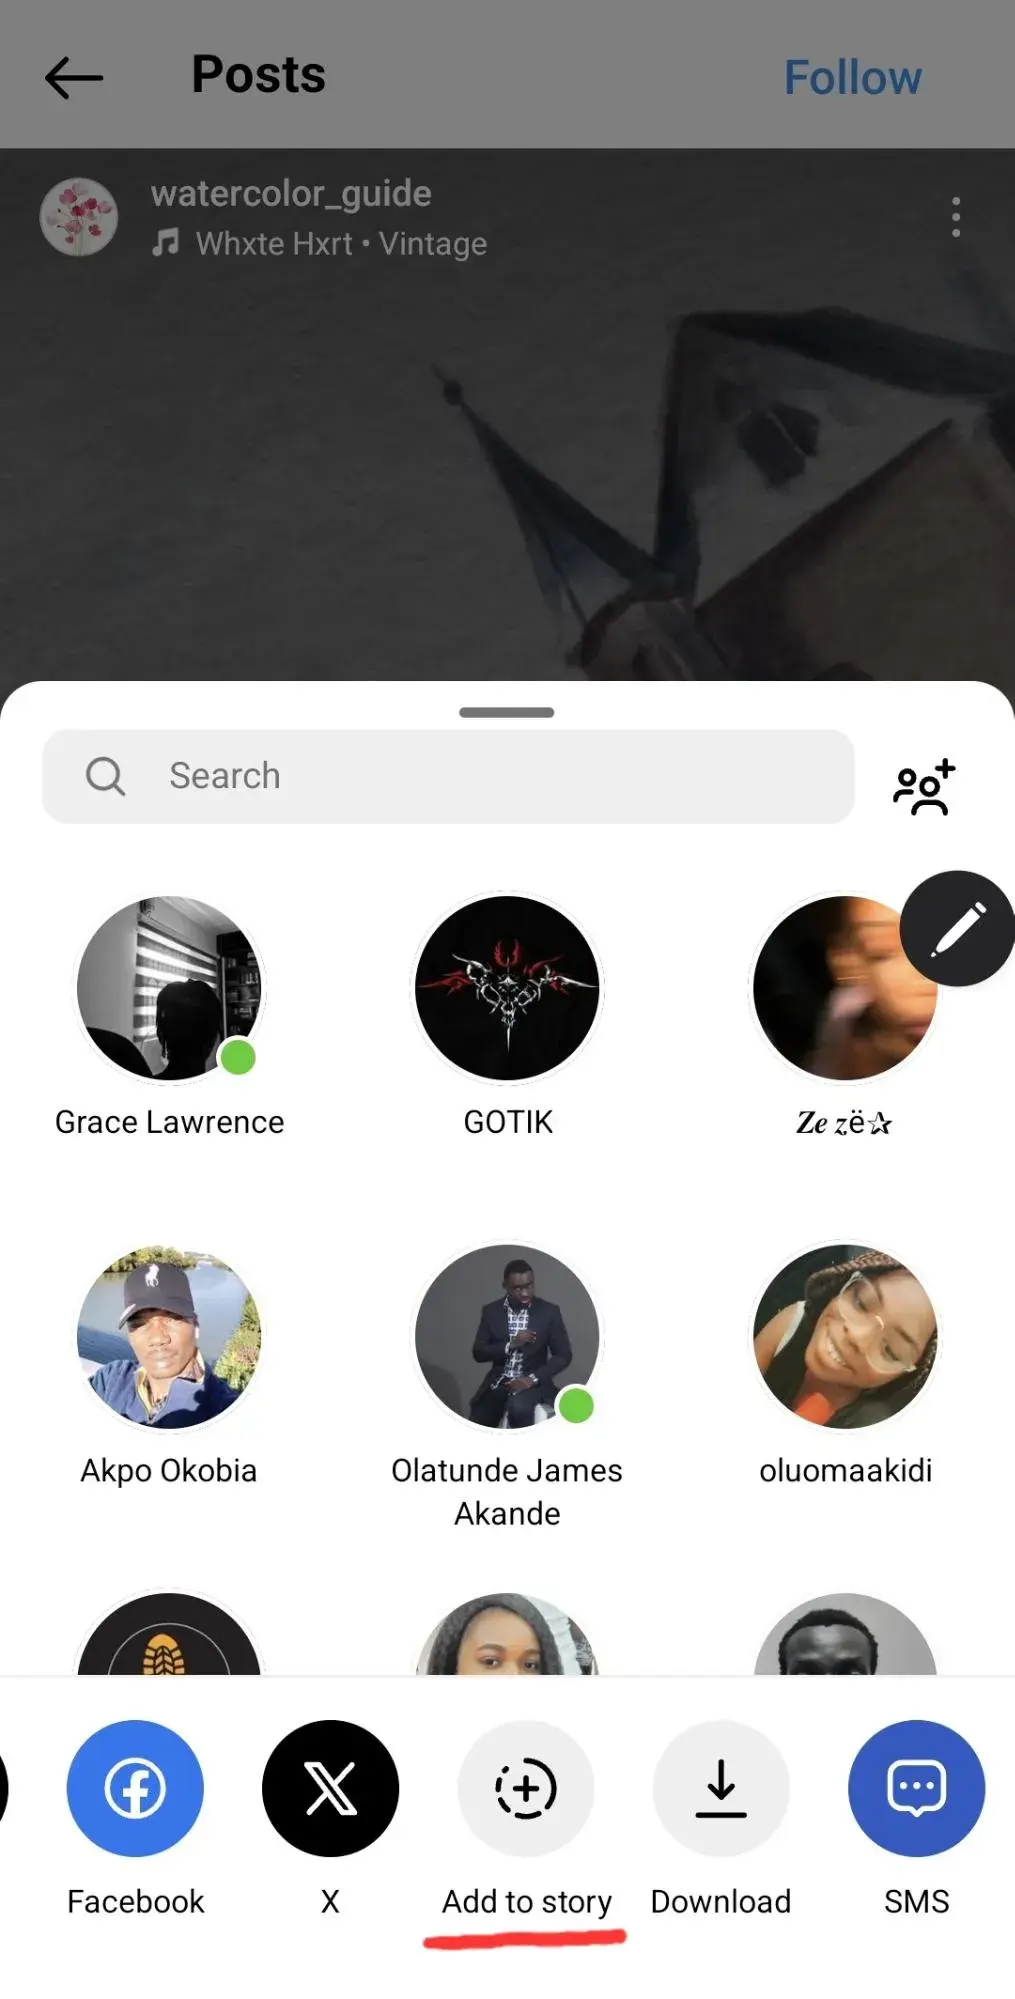
3. On the pop-up menu, click “Add to story.”
A menu will pop up with a few sharing options. If I’m sharing a post, I can add it to my Story, reply to the original poster (if they allow replies), or send the post via Direct Message to folks I interact with on Instagram.
Here, I’ll scroll through the bottom options (the apps) till I get to Add to story.
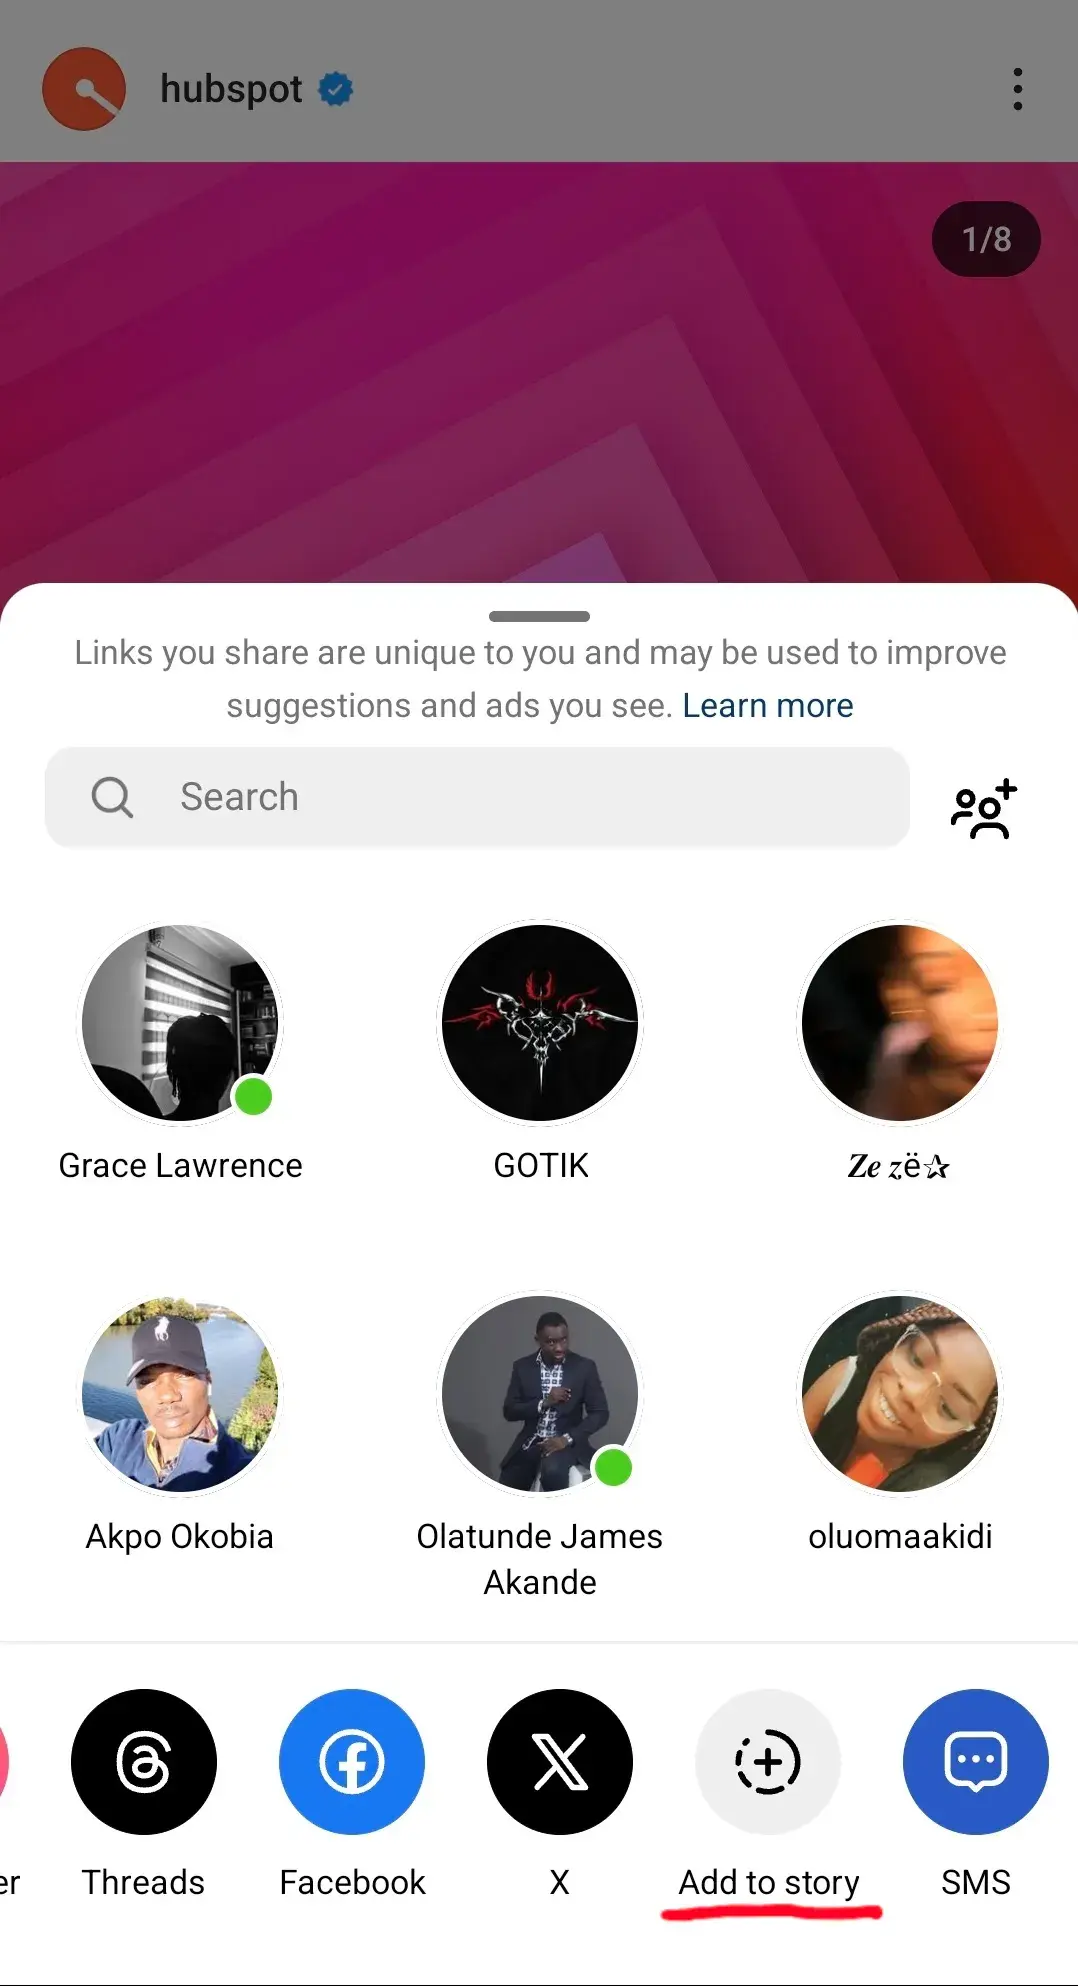
With Reels, the options are similar.
4. Tap to show and hide the post’s caption.
Once I click on Add to story, I see a draft of my Story.
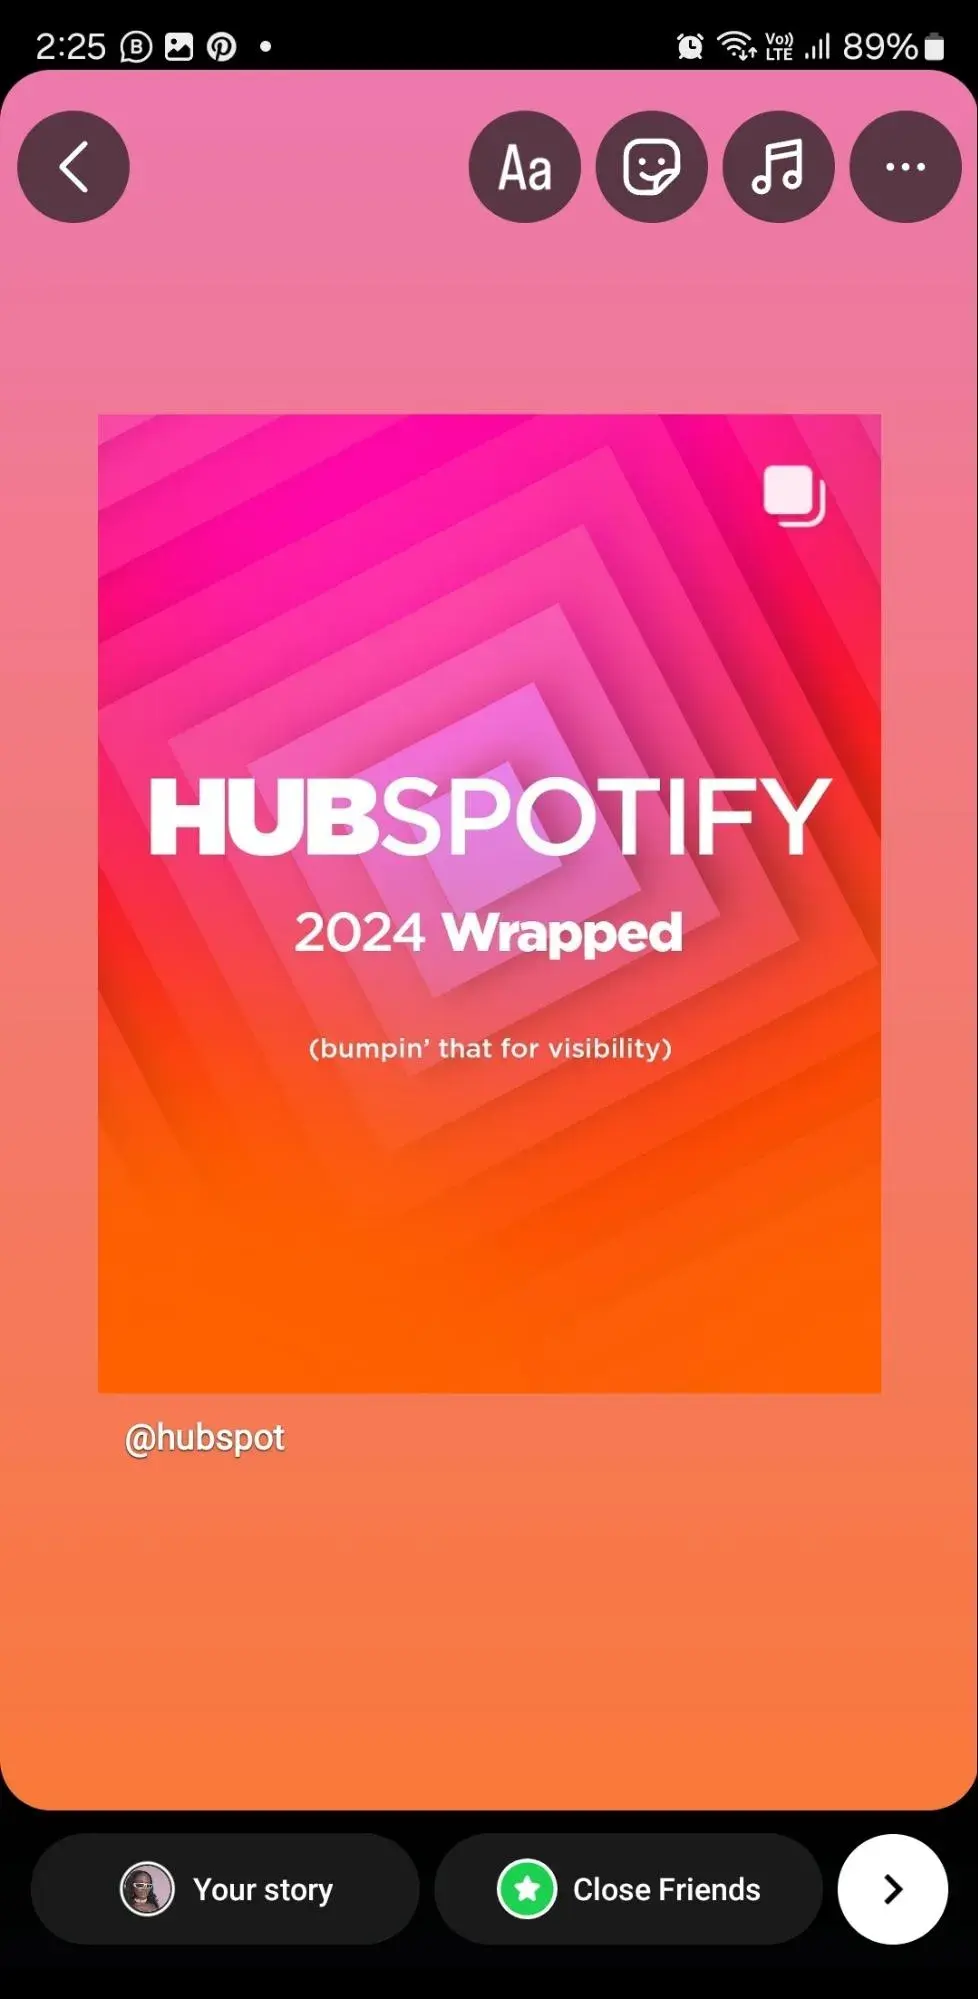
I have the option to toggle the caption on or off by simply tapping the post. This lets me decide if I want the original text visible or hidden.
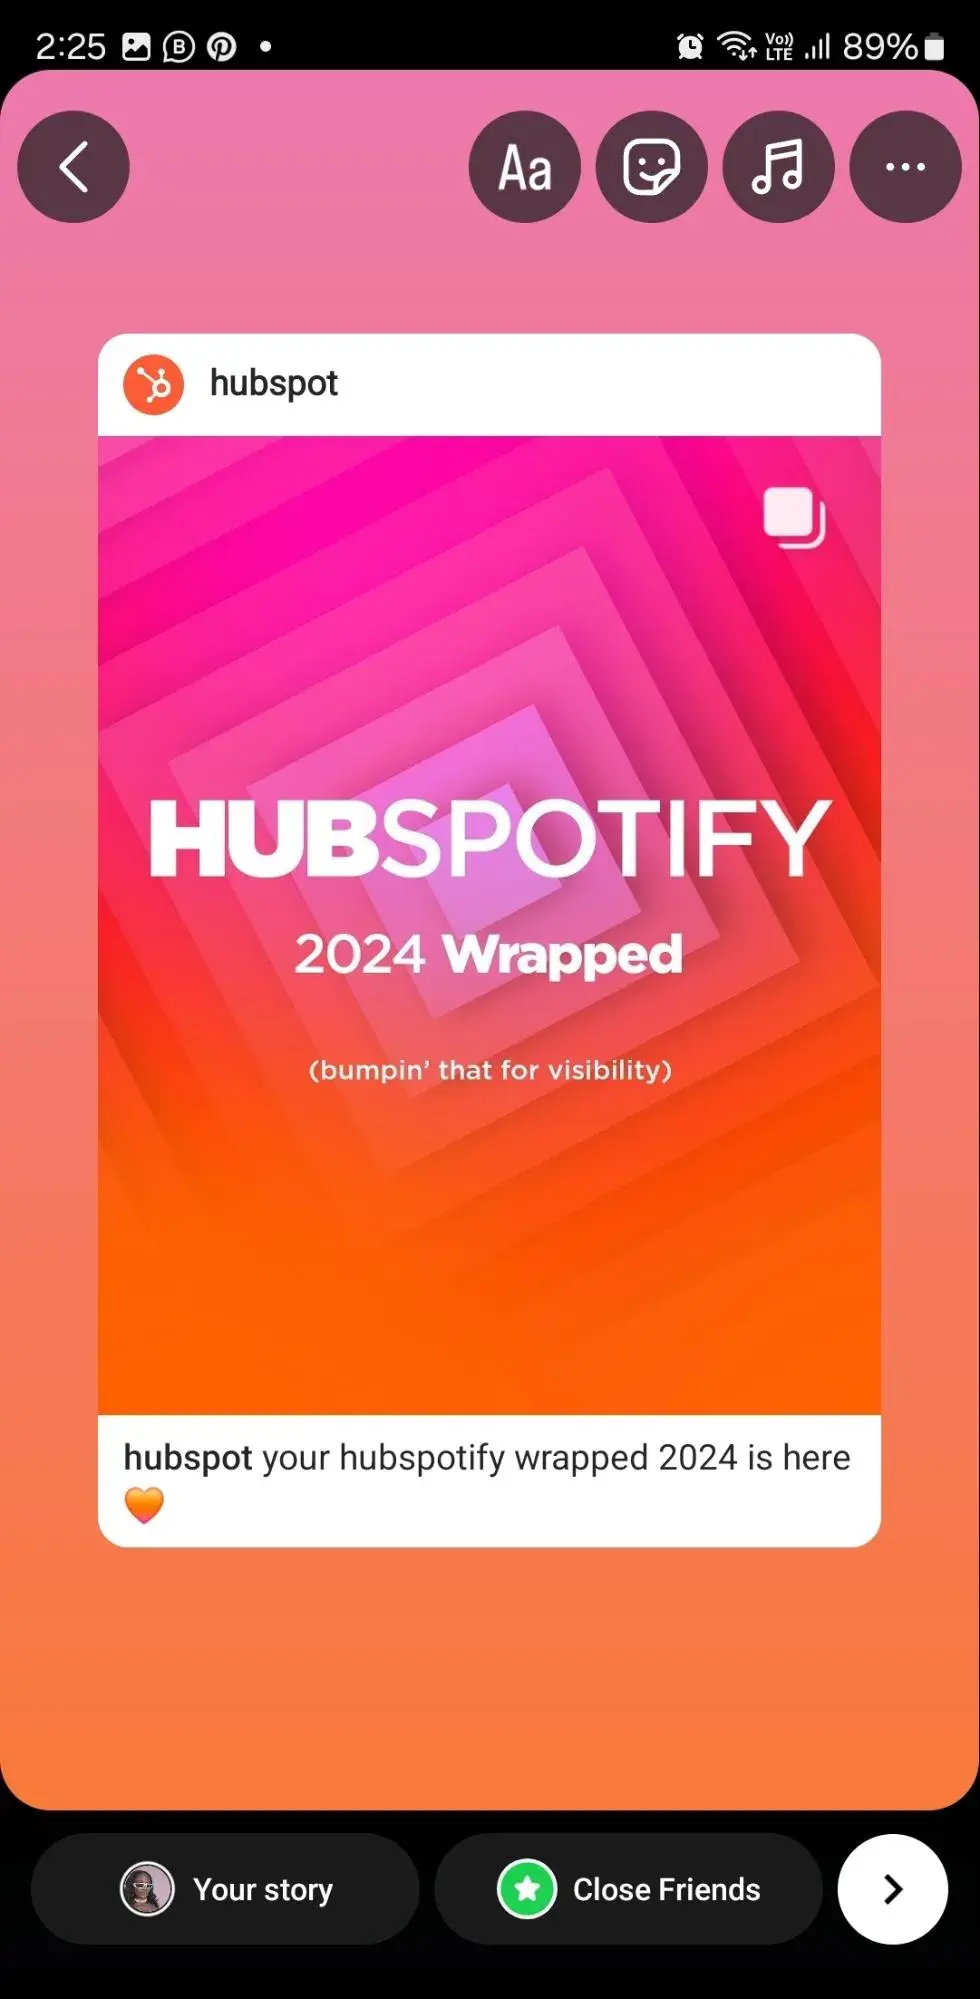
5. Add text, stickers, hashtags, and other elements.
This is where I get creative. Here, I get the option to spruce up the Story with text, stickers, hashtags, or even a link (or call-to-action) if it adds value. The goal is to make the repost feel on-brand for me and drive as much engagement as possible. Learn how to customize your Instagram Story here.

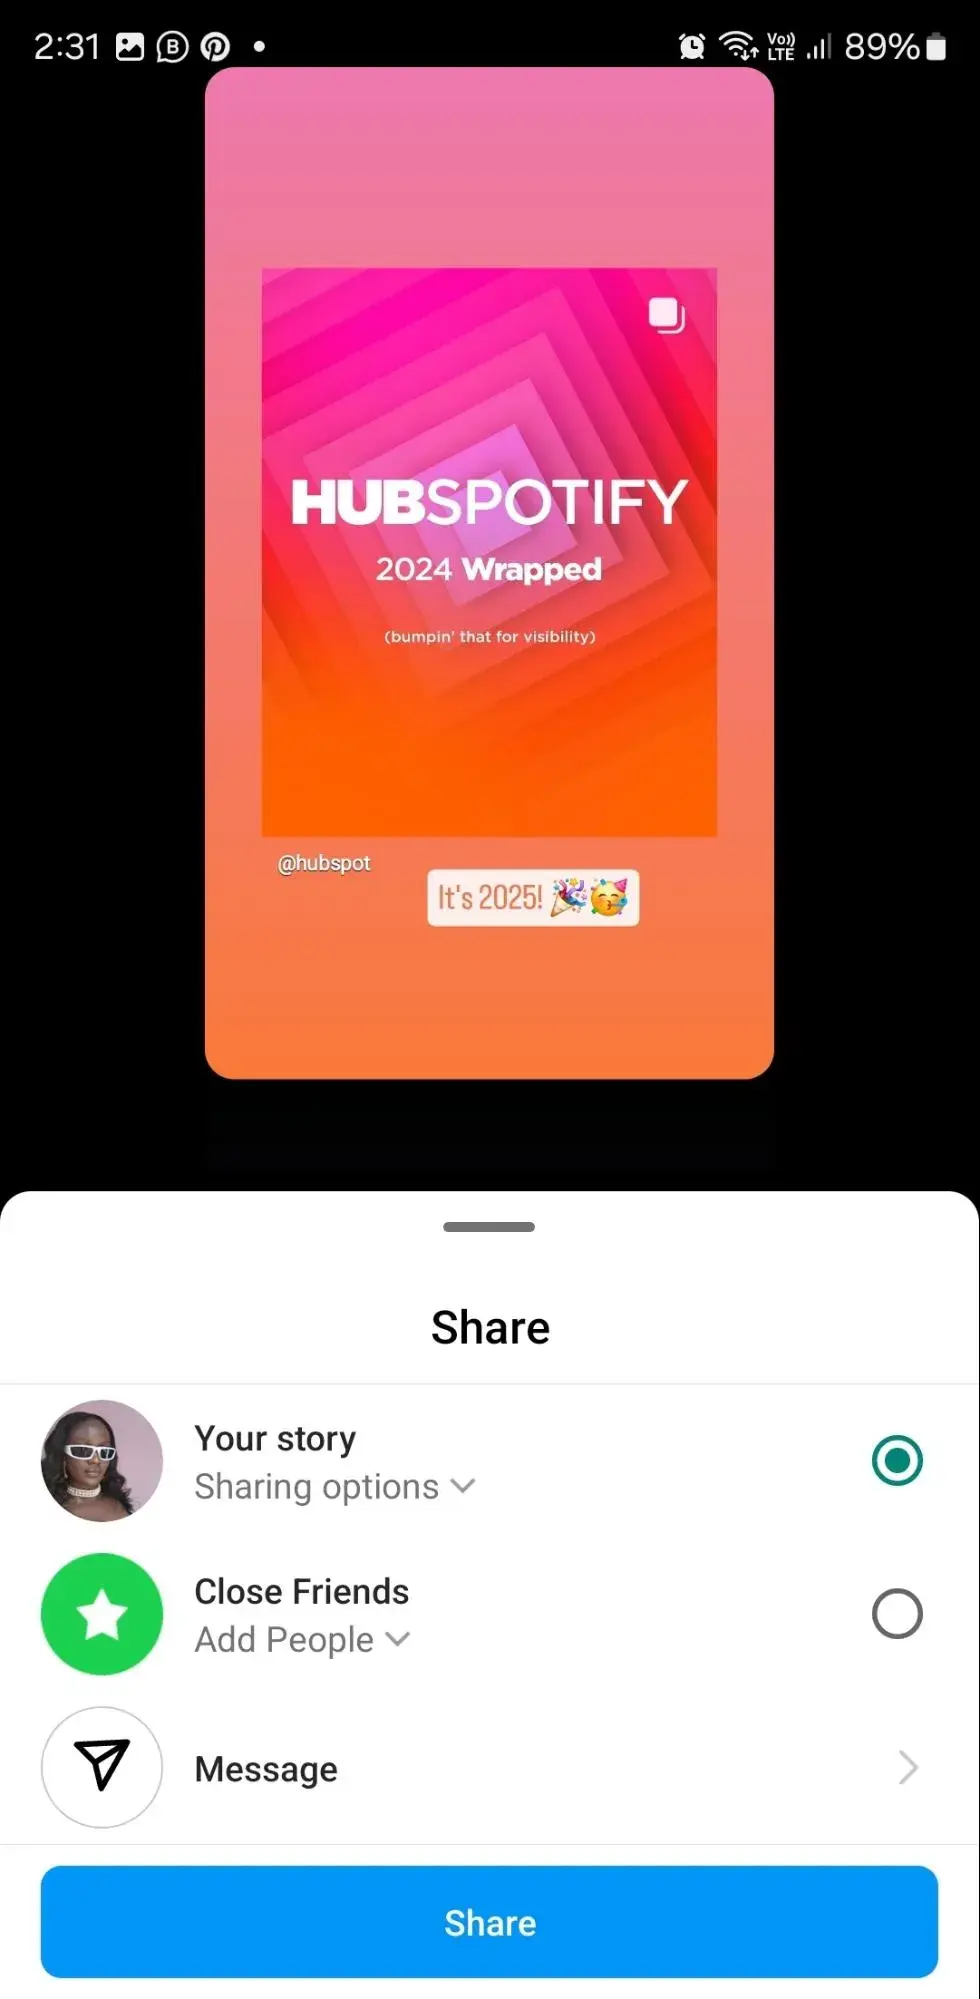
6. To share, click “Your Story.”
When I’m happy with the way it looks, I tap Your Story at the bottom to share it publicly with my followers.
Alternatively, I can click Close Friends if I want only a select group to see it. There’s also an arrow on the right-hand side that shows options for sending the Story via DM or just to my close friends list.
7. Add the shared post to your Highlights.
Since I can’t share reposted content directly to my permanent feed, I might add it to my Highlights if I want to keep it visible longer. Highlights stay on my profile indefinitely, which is a great way to showcase the reposted content that’s most relevant or visually appealing. Learn how to create Highlights here.
Here’s one example from the skincare brand Supergoop:

With Stories, the same best practices should be followed as for sharing a post. If you don’t know the person and suspect the content you’d like to reshare might be licensed material, ask for permission first. Give credit to the original posters whenever possible.
How to Repost on Instagram Using a Screenshot
- Take a screenshot of the Instagram post you want to use.
- Tap the new post button located on the top right corner, select post.
- Resize the photo in the app.
- Edit and add filters of your choice.
- Add a citation.
- Add a caption.
- Click share on the top right corner.
The screenshot method doesn‘t require other websites to repost on Instagram. It’s worth noting that this method only works for reposting photos, not videos.
Here’s how I do it.
1. Find a photo on Instagram you’d like to repost, and take a screenshot with your phone.

I start by finding a photo on Instagram that I’d like to share, and then I take a screenshot with my phone.
If I’m using my iPhone, I press the Home and Lock buttons at the same time until the screen flashes.
But on my Samsung (Android device), I press the Sleep/Wake and Volume Down buttons simultaneously until the screen flashes.
Pro tip: If you’re worried about accidentally capturing personal info or notifications in your screenshot, switch your phone to “Do Not Disturb” mode before taking it. This keeps your screenshot clutter-free.
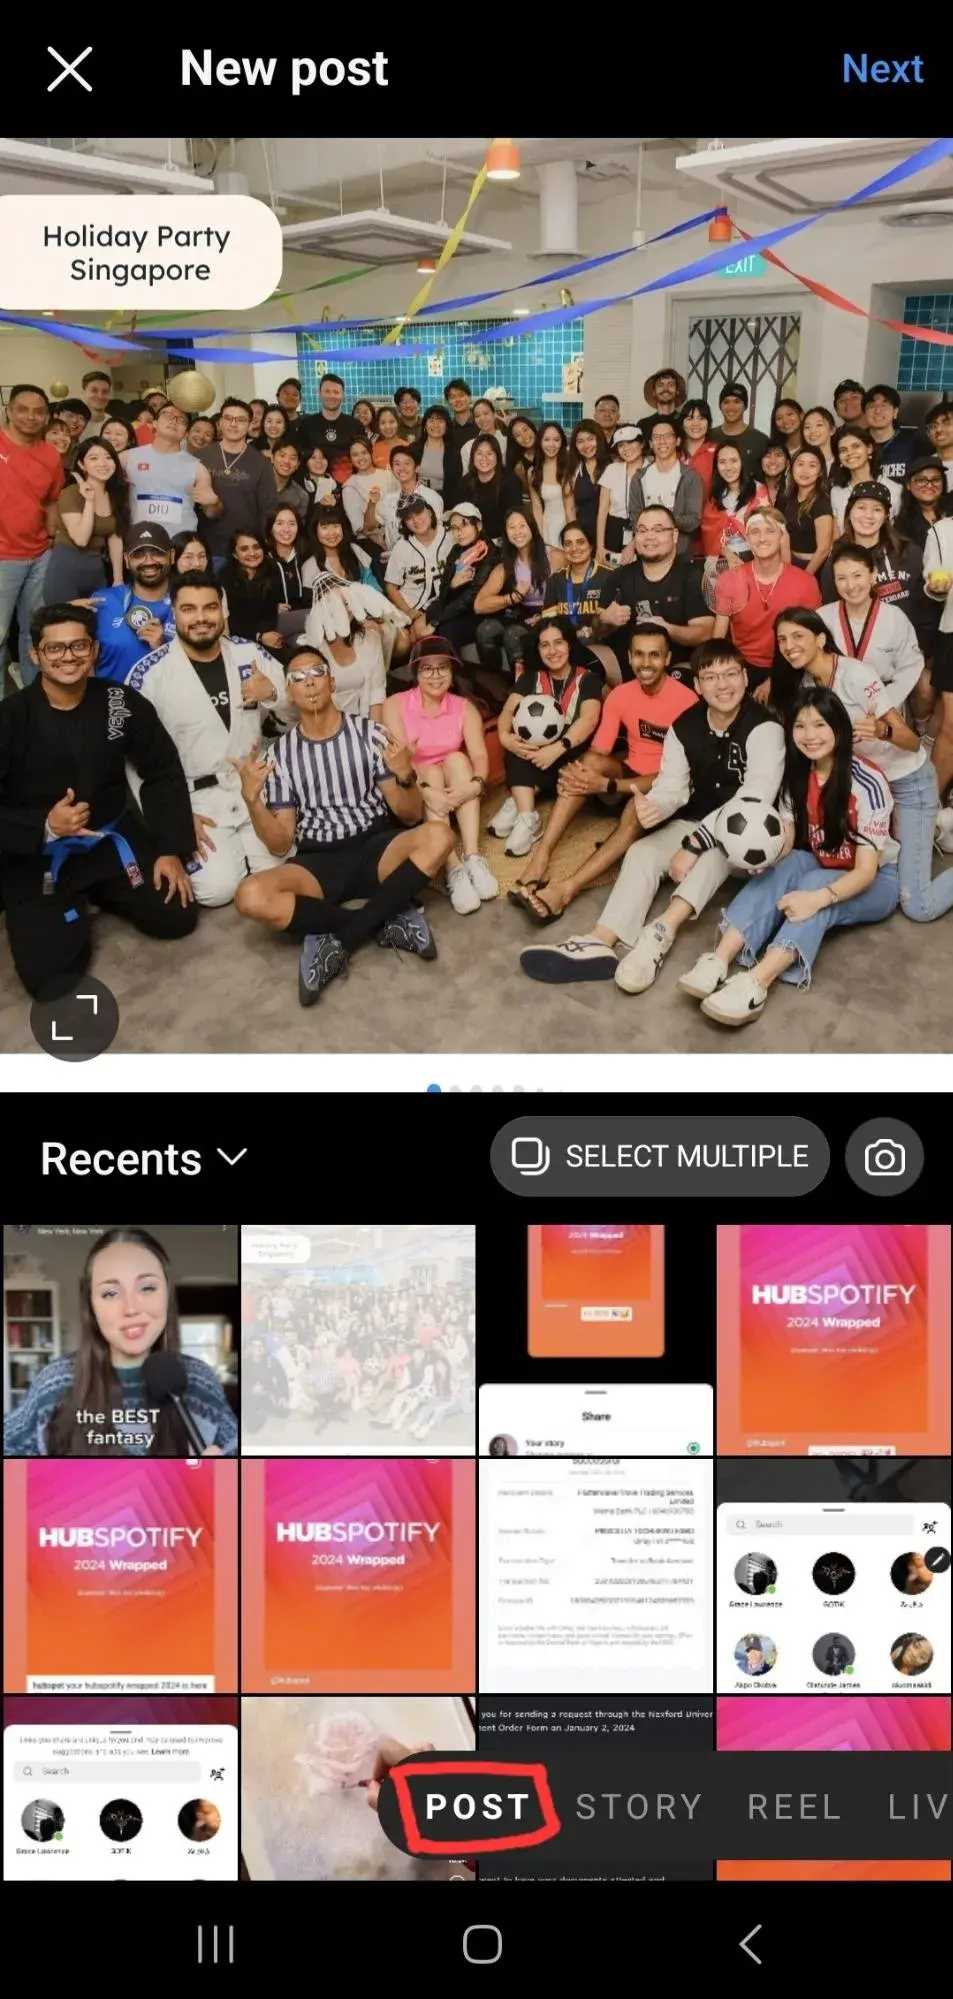
2. Tap the new post button.
Once I have my screenshot, I head back to my Instagram account. At the middle bottom of the screen, I tap the plus sign inside a square.

Then, I choose Post (this is the default setting, and there are other options like Story, Reel, and Live, but Post is what I need).
Pro tip: If you’re using Instagram to boost engagement, consider experimenting with different formats (like Reels) for reposting content. You might discover that certain types of posts get better responses from your audience.
3. Resize the photo in the app.
My phone screenshot includes everything on my screen, not just the photo I want to repost. So, I crop or resize the photo in Instagram to show just the image I want to share. I do this by pinching or zooming the screenshot until it looks right.
Then, I tap Next in the top-right corner.
Pro tip: Pay attention to Instagram’s image orientation guidelines. If you want your repost to appear neatly in your grid, try to keep the image in a square or vertical format. Also, preview how the post thumbnail looks in your profile grid before finalizing.
4. Edit and add filters of your choice.
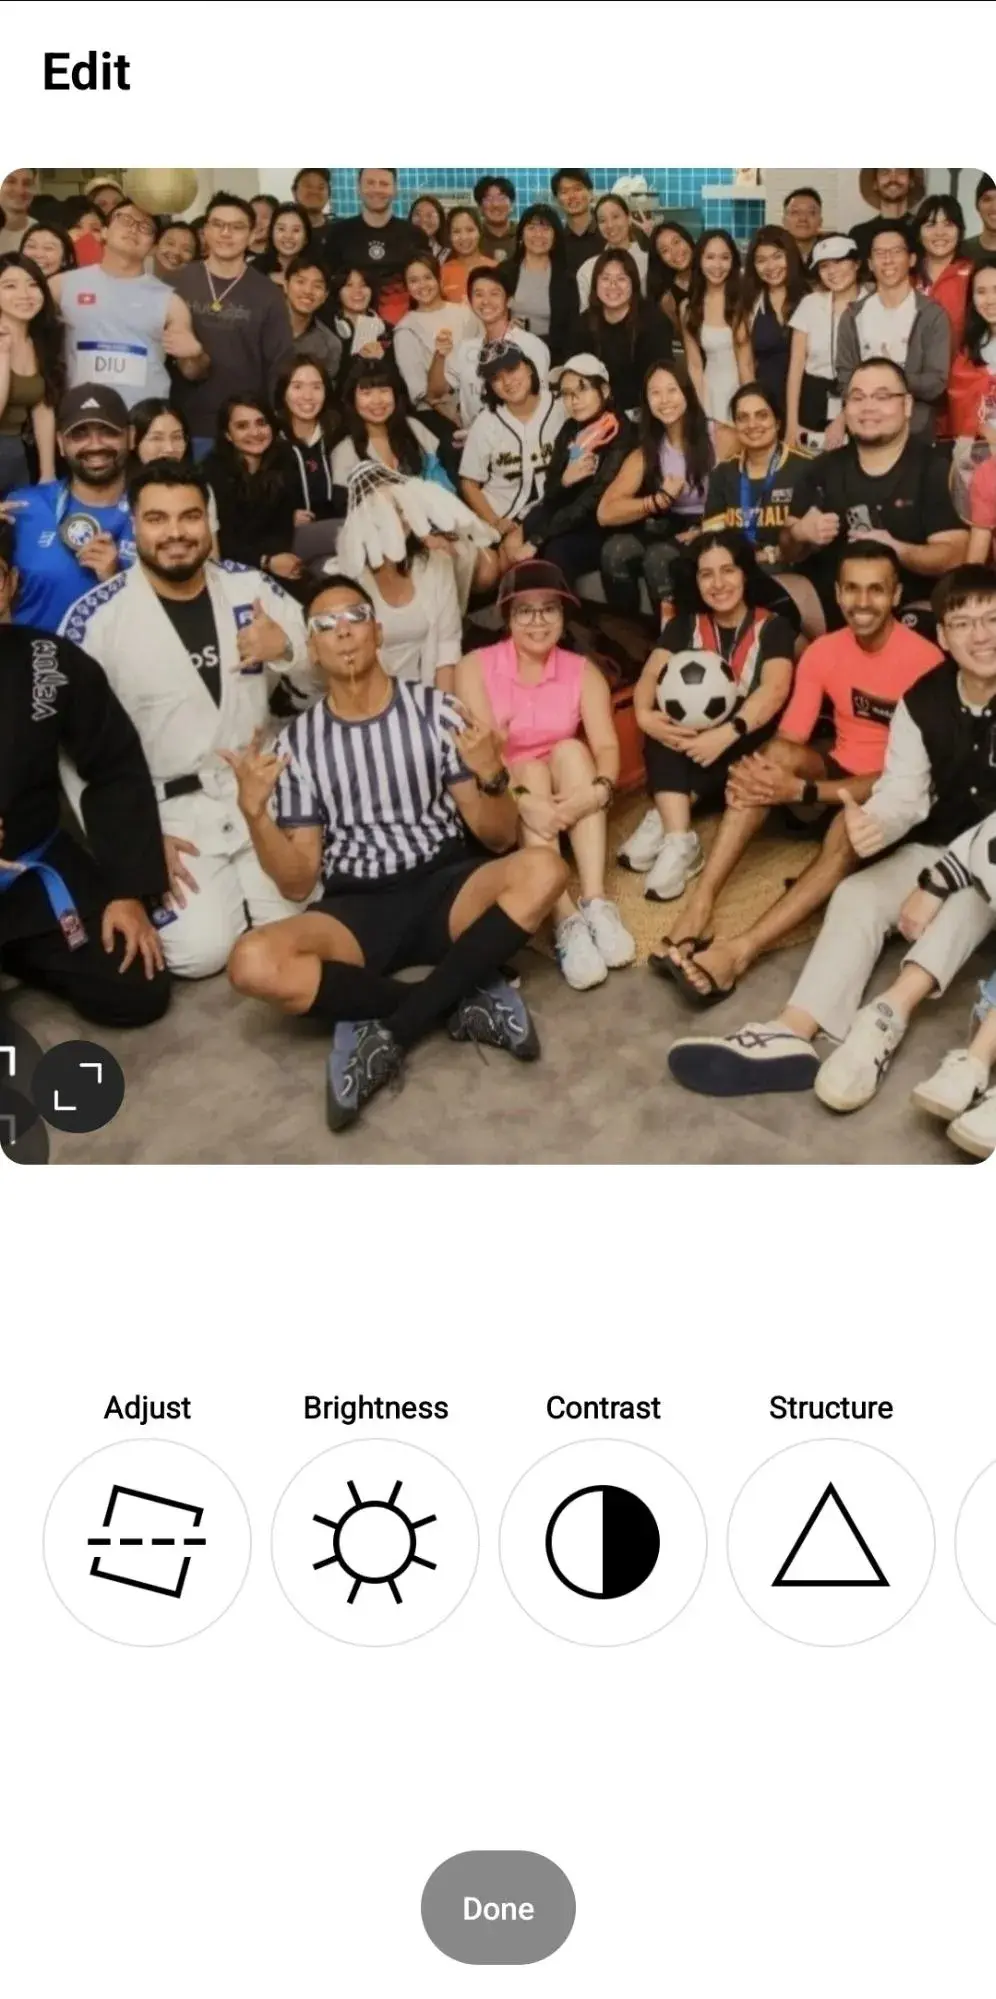
Here, I treat it like any other Instagram post — maybe I add a filter, adjust the brightness, or tweak the colors. I may also decide to add some music to go along with it.
Pro tip: Stay consistent with the editing style you use on your feed. This helps keep your branding cohesive. You can also use third-party editing apps before uploading to make your repost truly stand out.
5. Add a citation.
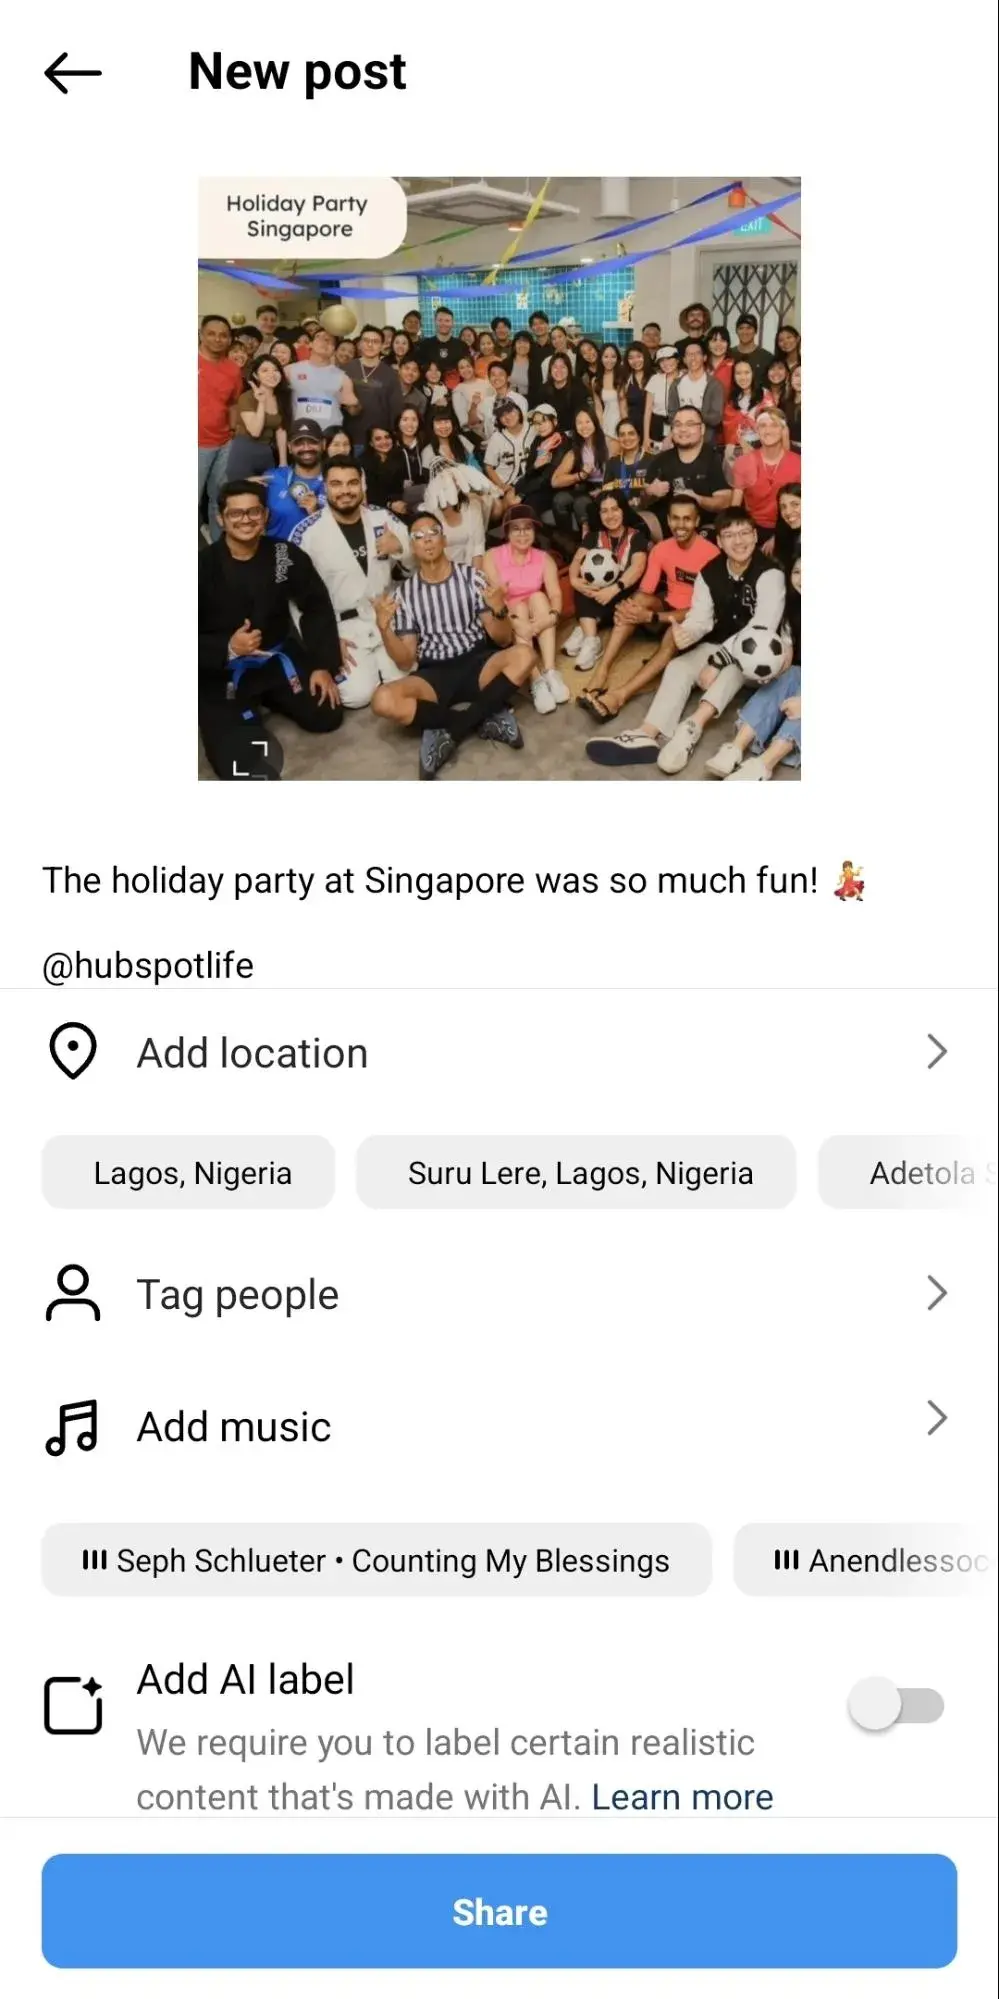
The repost won’t automatically include the original account info, so I make sure to credit the original poster by typing “@ + [username]” in my caption. This way, everyone knows where the photo came from.
Pro tip: If you want to strengthen your relationship with the original creator, send them a quick DM to let them know you’re reposting. People usually appreciate the courtesy and might even share your post with their own followers.
6. Add a caption.
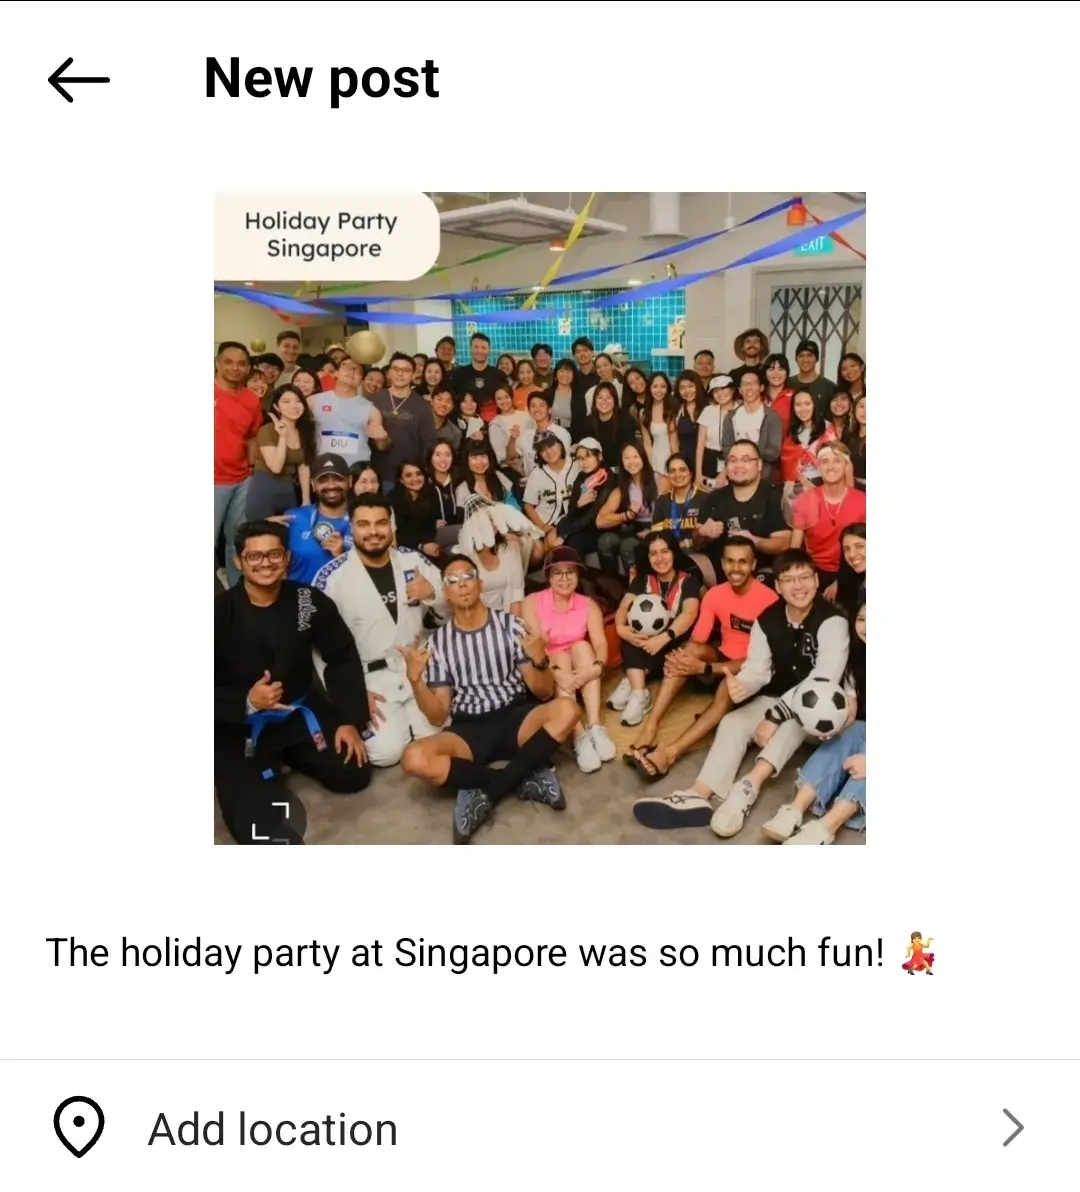
At the top, I see a preview of my post and a space for a caption. I can tag people or organizations if needed or add a location to make the post more discoverable.
Pro tip: Use relevant hashtags to increase the chances of your repost appearing in hashtag searches. You can also tag collaborators, partners, or friends in the post to encourage more interaction.
7. Click share.
Once I’ve finished customizing the post with the options above, I tap Share at the bottom of my screen, and my repost goes live on my feed.
Here’s what the finished product looks like:

Pro tip: Consider scheduling your repost for times when your audience is most active. There are scheduling tools available, or you can simply pay attention to your own Instagram Insights to figure out peak hours.
What to Know Before Reposting on Instagram
Before reposting content on Instagram, here are a few things you should know:
1. You should understand usage rights and permissions.
Before you repost any photo, Reel, or Story, you want to make sure you have the right to do so. Instagram’s Terms of Use and Community Guidelines still apply, and the content might have specific usage rights attached. If you’re not sure whether you can share it, consider asking the original poster for permission.
When I first started reposting, I often DM’d the user directly to double-check that it was okay for me to share their content. This step gave me peace of mind and helped me build positive relationships with other creators.
2. Always credit the original source.
I know I’ve mentioned this a few times in the article already, but when reposting, you should always give credit to the original creator by tagging them in the post or Story. Be sure to mention their handle in your caption or Story text. This not only shows respect for the creator’s work but also builds trust and goodwill.
3. Keep their context and messaging intact.
You don’t want to twist someone’s post into something it’s not, so avoid cropping or editing the content in a way that changes the original message. If you need to tailor the post for your audience, you can add stickers, text, or other Story elements, but keep the core content authentic.
4. Verify the accuracy of the post.
Before you share someone else’s photo, quote, or statistic, do a quick check to make sure everything is factual and up-to-date. Reposting content that turns out to be misleading can harm your credibility.
I’ve had a few moments where I was excited to share a trending post, only to discover it wasn’t entirely accurate. Taking that extra minute to verify the details protects you — and your audience — from spreading misinformation.
5. Be mindful of privacy and sensitivity.
Keep in mind that the person you’re reposting might be comfortable sharing certain details with their audience, but that doesn’t necessarily mean they want it widely circulated beyond their own followers.
If you notice that a post contains sensitive content, it’s wise to double-check the privacy settings and the creator’s preferences. You don’t want to inadvertently share personal or private moments without the original poster’s full consent.
Resharing on Instagram Best Practices
When resharing content on Instagram, here are some best practices to keep in mind:
1. Engage with the original creator and their community.
Whenever I repost someone else’s photo, I like to leave a thoughtful comment on their original post and respond to any comments they might have on my repost. You can do the same — this open dialogue helps you build deeper connections with other creators, which can lead to future collaborations or mutual shares.
2. Be transparent about sponsored content.
If you’re sharing user-generated content that you or your sponsor wants to highlight, make sure you follow Instagram’s guidelines and FTC regulations. For example, I’ll include #sponsored or #ad in the caption if there’s any form of brand deal. You don’t want your followers (or the FTC) thinking you’re misleading them.
3. Incorporate your own angle.
When you repost content, don’t be afraid to add your personal twist to it. For example, I often include a sentence or two in my caption explaining why this particular post grabbed my attention or how it connects to my brand’s goals.
You should do something similar: take a moment to share your perspective so your followers understand what makes the repost valuable or relevant.
4. Time your reposts strategically.
Timing can be everything on Instagram. I once experimented by sharing reposts during different times of day and noticed that my posts got more engagement when I shared them around lunchtime or early evening.
You’ll want to keep an eye on your Insights or analytics to figure out when your followers are most active, then schedule your reposts accordingly.
5. Watch how often you repost.
Reposting too often without posting your original content can make your account feel like a patchwork of other people’s posts. You don’t want to make the mistake of reposting so frequently that your own content gets lost in the shuffle.
Instead, strike a balance by spacing out your reposts and mixing in plenty of original content to keep your Stories personal (or professional) and engaging.
P.S. If you’re having trouble creating enough original content for your Instagram, check out Breeze, an AI-powered social media agent that can generate post suggestions that align perfectly with your brand, target audience, and brand identity.
It can also analyze your social performance, brand details, and marketing best practices to build a multi-channel social media strategy to boost awareness and drive conversions.
However, if you already have post ideas but want to expand (or shorten) your copy, HubSpot’s AI social media post generator can help with that. It can help you overcome writer’s block, create compelling captions, repurpose posts by channel, and generate multiple AI-assisted Instagram posts you can schedule to go live at a later date.
Best Apps for Reposting on Instagram
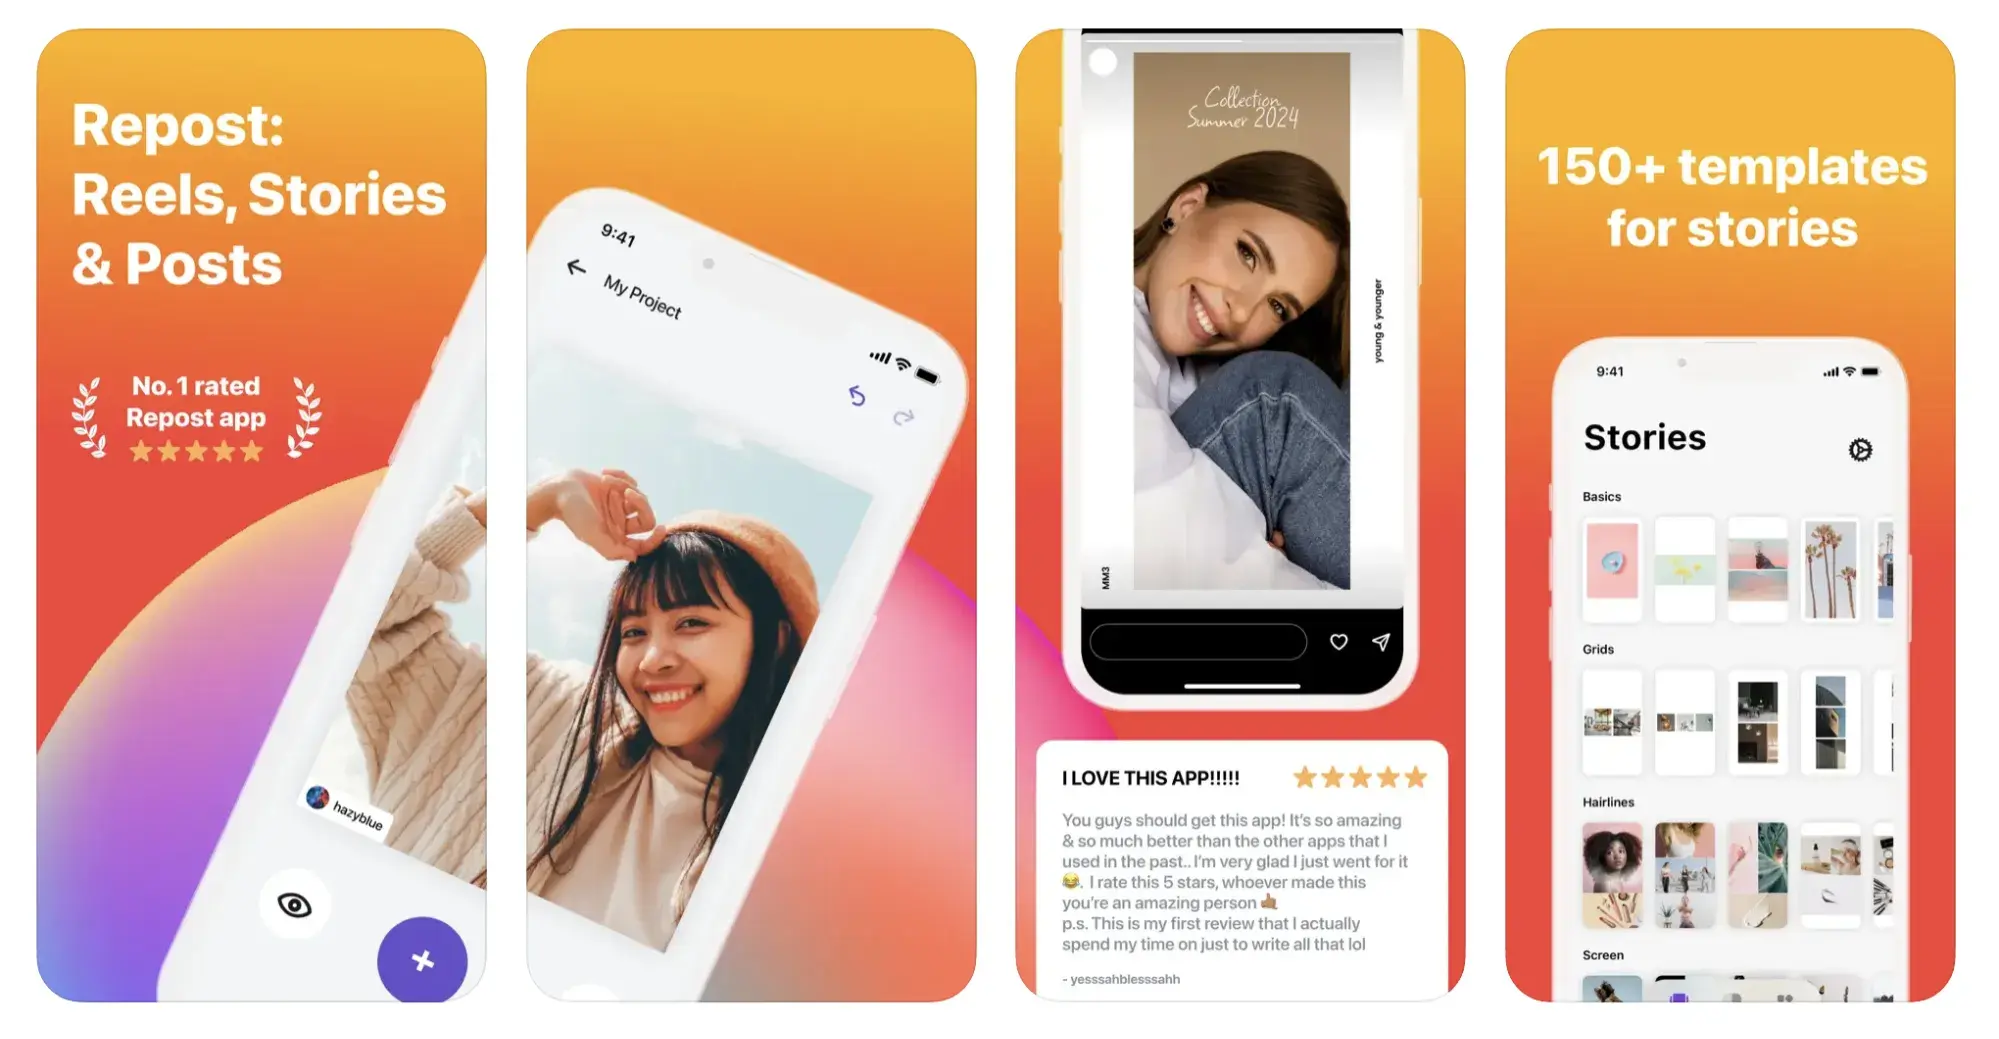
1. Repost: Posts, Stories, Reels
Price: Free with in-app purchases
Source
For Instagram for iOS or Android. The app integrates directly with Instagram, so you can share content from other Instagram users from your mobile device.
If your brand’s Instagram profile follows a distinct brand style guide, Repost can help you customize your reposts to adhere to those guidelines. You can pick from 50+ different text styles and symbol art to create eye-catching captions to capture more attention.
2. DownloadGram
Price: Free
DownloadGram lets social media users download high-resolution copies of content to repost from their own accounts on Instagram.
You don’t need to download an app to repost using this process. Instead, you can copy and paste the URL to download videos, photos, reels, or stories to repost via PC.
3. Snapinsta
Price: Free
Snapinsta provides an efficient way to download HD-quality Instagram photos, videos, and reels, which helps keep your reposts looking sharp and engaging. Just copy the Instagram link, paste it into Snapinsta, and download the content to share it on your feed or Story easily.
FAQs About Reposting on Instagram
1. How do you repost on Instagram?
There are two ways to repost content on Instagram. The first is to share the original post to your Story. Just tap the paper airplane icon under the post you want to share, then choose Add to story.
If you’d rather repost it on your feed, you can take a screenshot or use a third-party app to download the image. After that, upload it like a regular post, and make sure you credit the original creator in your caption.
2. Is it okay to repost content from a private account?
Reposting content from a private account isn’t advisable. If someone’s account is private, it means they’ve chosen to share their content only with approved followers. You should always respect that boundary.
Even if you happen to see a great post behind a private profile, it’s best not to repost it — or, at the very least, ask the account owner for explicit permission.
3. What’s the best way to credit the original creator?
Tag the creator directly in the caption (e.g., “Photo by @username”) and, if it’s a Story, you can also include a text sticker with their handle. This will avoid any confusion about who owns the post. Not only does proper credit keep you on good terms with the original poster, but it also boosts their visibility.
4. What if the original content has a watermark or branding from the creator?
You should keep those elements visible. Removing or editing out watermarks and logos can come across as disrespectful to the original creator. If you want to add your own branding or text, place it separately from the creator’s watermark so there’s no confusion about who owns the post.
Share Your Favorite Instagram Posts
When I first started reposting on Instagram, I thought it was just a simple way to educate my audience and let them know I was still active whenever I was short on original content.
But, as I learned more about how to share others’ content the right way, I realized that reposting on Instagram can be a strategic tool for increasing brand awareness and building relationships with other creators/entrepreneurs.
I learned that with a little bit of care and respect, like sending a quick DM to the original creator or making sure their watermark is intact, you can go a long way in building positive relationships on Instagram.
It’s also become clear that timing is everything. Reposting at the right moment can help me reach new eyes and give proper exposure to the amazing work I’m sharing.
Now that you’ve learned how to repost on Instagram, you can diversify your profile with content sourced from friends, family, and brands. Use the methods above — being sure to cite the source of the original post — to quickly and easily reshare your favorite content.
If you’d like to quickly generate your own original Instagram posts, check out our free and customizable Instagram templates for Instagram posts and Stories.
Editor’s note: This post was originally published in April 2017 and has been updated for comprehensiveness.


")
![the-hubspot-blog’s-2024-instagram-marketing-report-[data-from-600+-instagram-marketers]](https://blog.contentkrush.com/wp-content/uploads/2024/09/140161-the-hubspot-blogs-2024-instagram-marketing-report-data-from-600-instagram-marketers-510x369.webp "The HubSpot Blog’s 2024 Instagram Marketing Report [Data from 600+ Instagram Marketers]")
![the-ultimate-guide-to-instagram-for-business-[+-data-from-650+-marketers]](https://blog.contentkrush.com/wp-content/uploads/2024/10/140295-the-ultimate-guide-to-instagram-for-business-data-from-650-marketers-510x369.webp "The Ultimate Guide to Instagram for Business [+ Data From 650+ Marketers]")
 1000")
![the-pros-and-cons-of-instagram-marketing,-according-to-an-expert-[+-research]](https://blog.contentkrush.com/wp-content/uploads/2024/11/140545-the-pros-and-cons-of-instagram-marketing-according-to-an-expert-research-510x369.jpg "The Pros and Cons of Instagram Marketing, According to an Expert [+ Research]")


![13-tips-for-creating-videos-for-instagram-like-the-brands-you-love-[+-examples]](https://blog.contentkrush.com/wp-content/uploads/2024/10/140358-13-tips-for-creating-videos-for-instagram-like-the-brands-you-love-examples-510x369.webp "13 Tips for Creating Videos for Instagram Like the Brands You Love [+ Examples]")

 1,000 Instagram Followers – 26 Tips")

![41-instagram-features,-hacks,-&-tips-everyone-should-know-about-[new-data]](https://blog.contentkrush.com/wp-content/uploads/2025/06/141589-41-instagram-features-hacks-tips-everyone-should-know-about-new-data-510x369.png "41 Instagram features, hacks, & tips everyone should know about [new data]")


Comment here