Before Anna and I started contentki, we went to a cafe, pulled out a notepad, and began brainstorming all the services we could offer given our skills and experience.

We came up with content writing, SEO optimization, and content strategy. From there we dived even deeper into each category adding SEO blog writing, thought leadership, landing page copy, and social media to our list.

I’m glad we took the time to break this down early on, as it gave us a clear sense of who we were right from the start, rather than figuring out our services on the go.
The rough sketch in our notebook was what’s professionally known as a concept map. It’s a tool you can use not only when starting a business but also to ideate and thoroughly research new concepts before bringing them to market.
Table of Contents
- What is a concept map?
- Types of Concept Maps
- How to Create a Concept Map
- Creating My Own Concept Map
What is a concept map?
A concept map is a visual representation, often in the form of a diagram, that shows the relationship between various ideas or concepts. It’s a great tool for structuring and organizing knowledge. It typically includes two elements:
- Nodes. These represent concepts and come in the shape of circles, ovals, or boxes.
- Arrows. These connect ideas. They might include a connecting word or verb to explain the relationship between concepts, for example, “leads to” or “is part of.”
A concept map helps break complex topics/ideas into more digestible components.
Types of Concept Maps
Before I discuss the types of concept maps, here is a list of the best mind-mapping software you can check out to help you create your own concept map.
Spider Maps
I’m sure it won’t surprise you to hear that these concept maps resemble a spider web. The main concept is in the middle, with related subtopics branching outward. This structure lets you explore multiple aspects of the central idea.

How to create it:
- Put your main idea in the middle of the diagram.
- Draw lines coming out from the center to represent a key subtopic linked to the main idea.
- Add sub-branches from each subtopic to dive even deeper into the topic.
- Use labels or short words to better show the relationship between concepts.
When to use it: Use it to analyze a broad topic in detail.
Flowcharts
A flowchart represents a linear or sequential process or workflow. It uses symbols and arrows to show how information flows, often including decisions or actions.

How to create it:
- Define the process or task you want to illustrate.
- Draw arrows to show the flow of steps. Use boxes or other shapes to represent each step or action.
- Use a diamond shape for decision points, and demonstrate different branches based on yes/no or any other criteria of your choice.
- Continue until you conclude.
When to use it: I find flowcharts are great for explaining processes, like the onboarding of new employees.
System Maps
Instead of focusing on the main idea, system maps highlight the relationships and interactions between different concepts. They lack a hierarchical structure and emphasize how various parts work together.

How to create it:
- Define the key system components.
- Arrange them based on how they are interrelated instead of in a hierarchical order.
- Draw lines between components to show how they are linked. I think it’s helpful to add words like “influences” and “depends on” to better explain the type of relationship.
- Expand each part of the system by spotting feedback loops, inputs, and outputs.
When to use it: Use system maps to understand and analyze complex systems, such as supply chains or organizational networks.
Hierarchy Maps
A hierarchy map illustrates how elements are interconnected in a hierarchical structure, showing their relative status. This means that ideas have a higher status while others, a lower status. The main concept or the highest ranking element is at the top, while the lower-ranking ones are positioned beneath it.

How to create it:
- Put the main concept or the highest-ranking one at the top of the map.
- Define the major subtopics that fall under the main idea and place them directly below. Connect them by lines.
- Branch downward to show lower-ranking concepts while keeping a clear hierarchical structure.
When to use it: I think it’s useful for showing information with multiple authority levels or importance, for example, government structures or Maslow’s Hierarchy of Needs.
How to Create a Concept Map
Before you start working on your concept map, I suggest downloading HubSpot’s concept map template — it will make the process a whole lot easier.
1. Define your main topic.
Begin by choosing the main idea or topic that you want to analyze. It should be broad enough to allow a few subtopics to branch out.
Put the primary concept either at the top or middle of your map, depending on the type of map you’re using. It will act as the foundation from which all your other ideas will be developed.
2. Identify essential concepts.
Once you’ve figured out the main idea, start brainstorming additional topics you’d like to explore. Think of as many as you can, but instead of placing them directly on the map, list them first — this is known as the “parking lot” method.
After your list is ready, organize the concepts from the most general or broad to the most specific. I think it’s best to create a hierarchy with the most important/broad ideas at the top and the more detailed ones beneath them.
3. Move concepts from the parking lot to the map.
Now, you can move your concepts from the parking lot to the map.
Put the main idea in the center or at the top, with related subtopics branching out from it. Each additional topic should be linked to a specific category, eventually forming a hierarchy.
While arranging the concepts, I suggest using linking words to clarify the relationship between ideas. This will enhance the understanding of how each concept connects to the others.
4. Verify accuracy and coherence.
The more connecting ideas you have, the greater the chance of making a mistake. So, it’s best to review each connection to ensure it links to the correct concept.
Use cross-links to find ideas located in a different part of your map. This approach may help you connect them to additional concepts, creating a more comprehensive and interconnected structure that reveals even more insights.
5. Expand and revise.
Your concept map isn’t set in stone. As new ideas emerge, you can keep adding them to the map to create new connections.
I appreciate that the map is flexible, letting you rearrange, remove, or add new sections as you gain a deeper understanding of the topic.
The process doesn’t end with the first version; I suggest you regularly check if your map is complete and relevant. Make revisions when necessary.
Creating My Own Concept Map
Let’s get down to practice. I will now create a concept map for my own freelance business.
Step 1: Identify my primary topic.
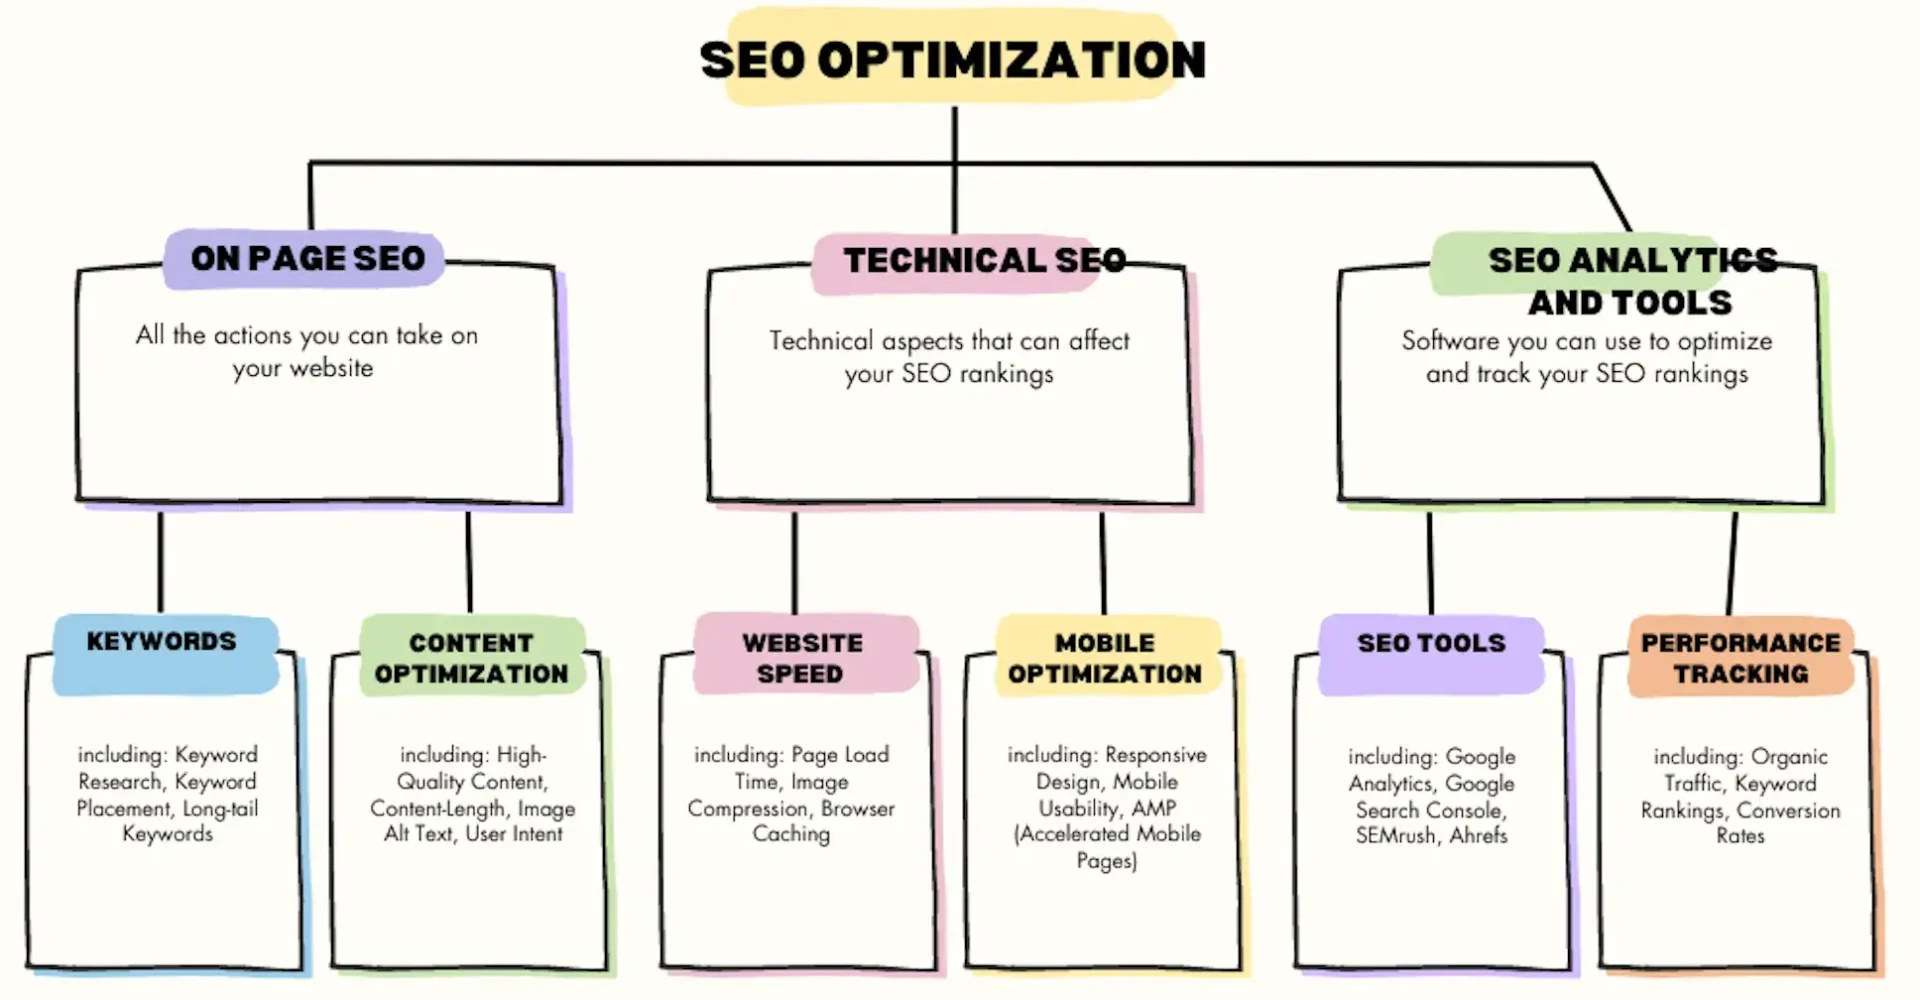
Since I am a freelance content marketer, one of the areas that I deal with is SEO optimization, which will be my primary topic.
Step 2: Identify essential concepts.
I’ll break it down into a few subcategories: on-page SEO, technical SEO, and use of SEO tools. For the sake of this example, I’ll only mention three, but feel free to come up with as many as possible, like off-page SEO and local SEO.
Write them all down.
Step 3: Move concepts to the map.
Once I’ve listed the main concepts, it’s time for me to zero in on each of them and list relevant subcategories. For example, on-page SEO can be broken down into substeps like “keywords” and “content optimization.”
If I wanted to go even deeper, I could add “keyword research,” “long-tail keywords,” and other smaller concepts under the “keywords” subtopic.

I’ve done this with all three main topics and wrote two subcategories for each, along with ideas for further branching.

Notice how the map helps us understand that SEO is a multifaceted concept and that — while it’s most often an area handled by marketing — it overlaps with areas like technical website/app performance.
Step 4: Double-check for accuracy and coherence.
In this step, I review if I’ve assigned each idea to the correct category.
For example, I ensured that “user intent” is placed under “content optimization” rather than “website speed.” Bear in mind that some concepts like “keyword research” might fit in more than one category.
Step 5: Expand and revise.
I’ll treat this concept map as my first version. The more time I spend brainstorming ideas, the more subcategories I can add.
I could expand my map to include “URL structure,” “internal linking,” “indexing,” and “security” — all of which relate to SEO optimization.
Also, as mentioned earlier, it’s important to identify relationships between different categories. For example, I could create a link between “SEO tools” and “keywords,” as the data from the SEO tools I use will influence my keyword selection and inform my overall SEO strategy.
If you’re a content marketer like I am, here is a content mapping template to help you organize your work.
The best way to create a concept map is to use a ready-made template.
I love brainstorming, but sometimes I generate so many ideas that I get lost, and within five minutes, I’ve forgotten half of what I came up with.
A concept map is a great tool for organizing your thoughts and ideas. It helps with exploring a specific topic in detail, ensuring a deep understanding. You can start small, and expand on your map as you generate more ideas.






![What Businesses Get Wrong About Content Marketing in 2024 [Expert Tips] what-businesses-get-wrong-about-content-marketing-in-2024-[expert-tips]](https://blog.contentkrush.com/wp-content/uploads/2024/03/130890-what-businesses-get-wrong-about-content-marketing-in-2024-expert-tips-510x369.png)


Comment here